Kimono Robe Pattern: Measurements, Cutting and Sewing
You've cleared the table, fabric's unrolled, and the robe in your head looks simple. Four rectangles, wide sleeves, a belt. Then you wrap the first version around your hips, sit down, and it gaps. Or the sleeves drag in the sink. A kimono robe pattern isn't hard to sew, but it isn't a forgiving one-size block either. You're balancing ease, fabric weight, sleeve geometry and intended use, and the wrong balance wastes good cloth.
Terry, Waffle and Lightweight Woven
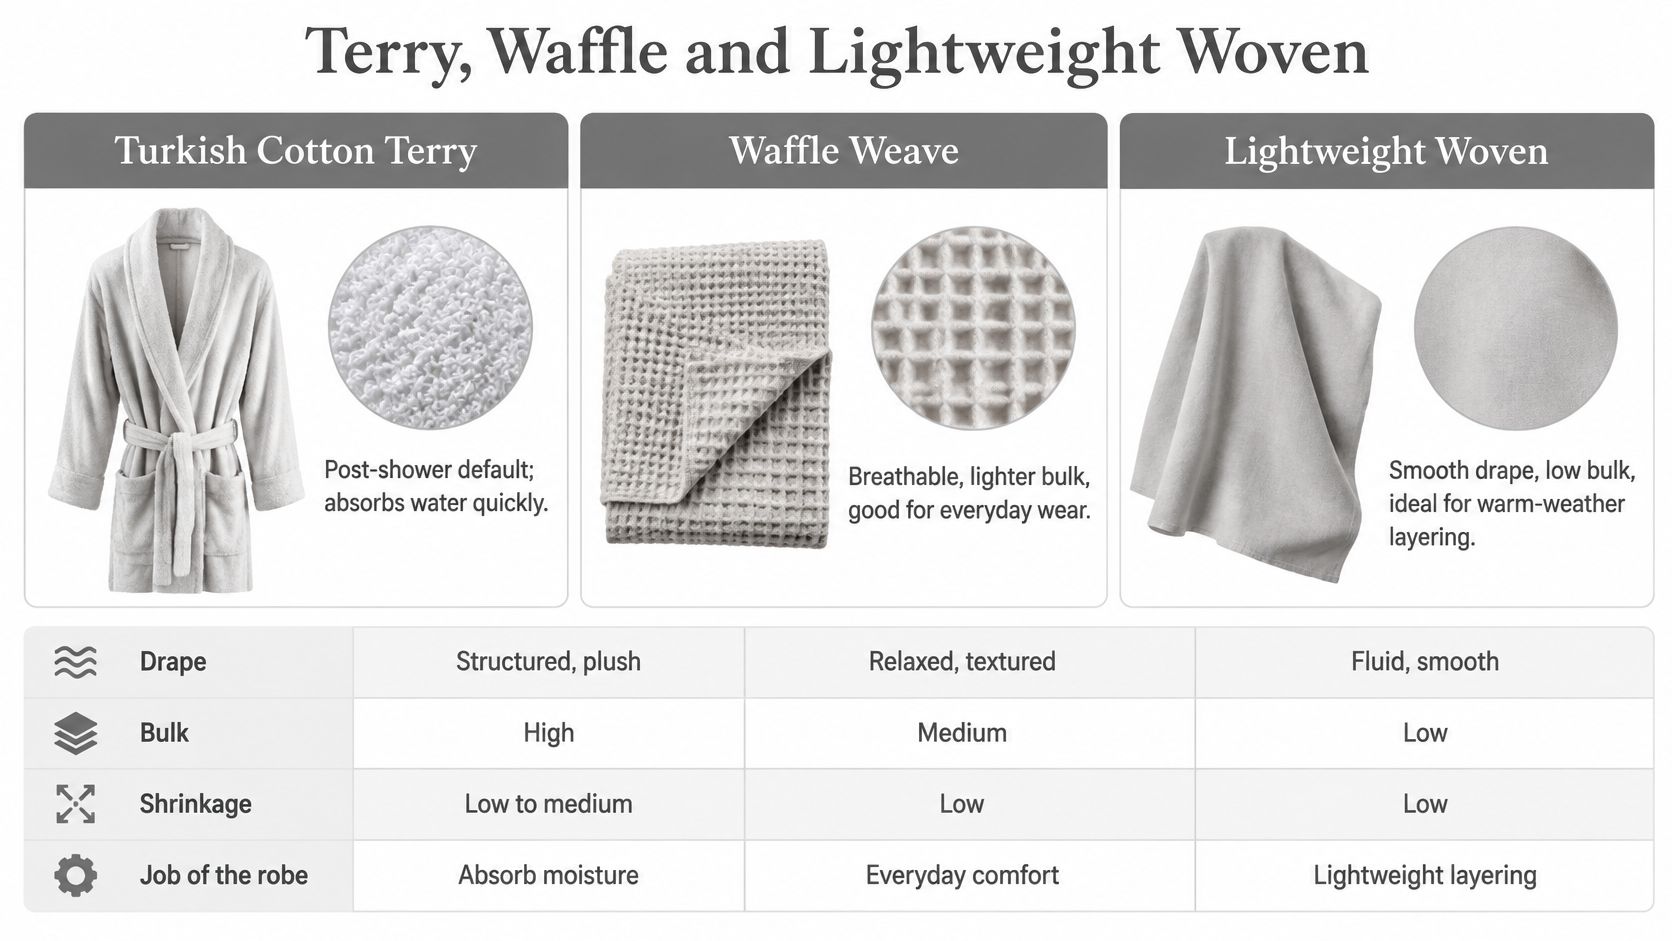
Choose fabric before you settle a single measurement. The same kimono robe pattern cut in heavy terry and in waffle won't sit, close or dry the same way, because drape and bulk change how much ease you get once the seams are joined.
Terry Versus Waffle
Turkish cotton terry is the post-shower default. It absorbs water quickly, feels substantial against damp skin, and adds warmth. That weight is also the problem at the machine. Loops build bulk in shoulder and side seams, collars get thick where layers fold, and a belt cut from terry ties clumsily. Give yourself a wider seam allowance than you'd use on flat cotton, and wash and measure a swatch before cutting, since shrinkage shortens length where you can least afford it.
If loops catching on the presser foot or shedding at the cut edge are new problems for you, practical guidance on sewing with terry towelling fabric will help you plan needle, stitch length and edge handling before you commit the robe pieces.
Cotton waffle weave sits at the other end. It is lighter, more breathable and holds its shape well, so it suits everyday lounging, travel and warm bathrooms. The textured surface can catch on fine seam finishes, and it won't absorb like terry straight out of the shower. Because waffle holds its line instead of collapsing around the body, a waffle version often needs less hip ease than a terry one to wrap just as securely. That difference lands directly on the pattern: the front panel width that closes comfortably in terry can leave a thin, gap-prone overlap in waffle.
Lightweight Woven and Linen
Lightweight woven cotton drapes fluidly and works for a spa-style or summer robe that layers over sleepwear. It presses cleanly, takes French seams well and adds almost no bulk at the collar. Linen is crisp at first, softens with washing and breathes beautifully, but it creases easily and benefits from a wider hem so the skirt of the robe hangs instead of curling.
If organic fibre matters to you, look for GOTS (Global Organic Textile Standard) certification, which our Organic Turkish Terry bathrobes carry. Our waffle robes are made from Turkish cotton, and the Women's Lavender Blue Lightweight Kimono Waffle Spa Robe is a lightweight option for everyday use. For a broader comparison before you buy yardage, our guide to bathrobe materials and fabric types lays out how fibre and weave affect warmth and care.
Robe fabrics compared for pattern decisions
| Fabric | Drape and weight | Bulk and shrinkage | Best use |
|---|---|---|---|
| Turkish cotton terry | Heavy, absorbent | High bulk in seams, shrinkage test needed | Post-shower robe |
| Cotton waffle weave | Light, breathable, holds its shape | Low bulk, moderate shrinkage | Everyday lounging, warm climates |
| Lightweight woven cotton | Fluid, lightweight | Low bulk, stable | Spa-style or summer robe |
| Linen | Crisp, fluid | Low bulk, creases easily | Summer robe, wider hem needed |
Practical rule: Pick the fabric and the job first. Then set ease, seam allowance and sleeve width to match that cloth, not the other way round.
I wouldn't draft in terry dimensions and hope waffle behaves. Heavy cloth steals room inside the garment, light cloth shows every gap at the wrap, and both punish a pattern that assumes fabric doesn't matter.
Pattern Dimensions to Measure and Draft
Three measurements decide whether this robe works. Get them wrong and no seam finish will save you. Get them right and the rectangles almost draft themselves.
The Three Measurements That Matter
First, take total body length from the back of the neck down to where you want the hem to land. Decide that point while standing barefoot, then check it seated, because a robe that looks elegant standing can ride uncomfortably high on the thigh when you sit.
Second, measure hip circumference at the fullest point, tape level and not pulled tight. The hip, not the waist, controls wrap security. A robe can have generous room at the chest and still expose you at the hip if the fronts don't overlap far enough there.
Third, measure yuki, the span from centre-back neck to wrist with the arm extended out to the side. That single span gives you body width plus sleeve length, so it controls sleeve proportion and shoulder placement together. If you're measuring someone else or checking your own tape placement, a clear walkthrough on taking accurate measurements for sewing helps you keep landmarks consistent between fittings.
Turning Measurements Into Pieces
Draw the back panel on the fold at the full body length plus hem allowance. Each front panel starts at roughly one-quarter of the hip measurement, then you add wrap overlap and your share of the ease. The sleeves come from what remains of the yuki span once the body panels take their width, so a longer arm span gives you a longer sleeve without changing the body.
Say you're drafting for a 100 cm hip and a 110 cm finished length. Each front starts near 25 cm before ease. The back, cut on the fold, is drafted at half width but represents the full back, and its cut length is the 110 cm finished length plus hem allowance. You then distribute at least 25 cm of total hip ease across the body so the finished hip measures 125 cm or more. That ease isn't vanity sizing. It's sitting room, walking room and overlap combined.
Pattern piece dimensions from body measurements
| Piece | Drafting rule | Example at 100 cm hip |
|---|---|---|
| Back panel (on fold) | Finished body length plus hem allowance | 110 cm plus hem allowance |
| Front panels (each) | About one-quarter of hip measurement, plus wrap overlap | About 25 cm before ease |
| Sleeves | Remaining yuki span after body panels are laid out | Yuki minus body panel width |
| Total hip ease | Minimum added to hip circumference | At least 25 cm |
| Neck opening | Fixed width at the back neck | About 20 cm |
| Seam and hem allowance (cotton) | Traditional-style allowance | 1 to 1.5 cm |
| Seam and hem allowance (terry) | Extra for bulky seams and shrinkage | More than 1.5 cm |
Before you cut, wrap a tape around the hips of the person who'll wear it, then compare it with your drafted finished hip. If the robe isn't at least 25 cm larger, redraw the fronts wider. Paper is cheap. Terry isn't.
How to Draft and Cut the Robe Step by Step
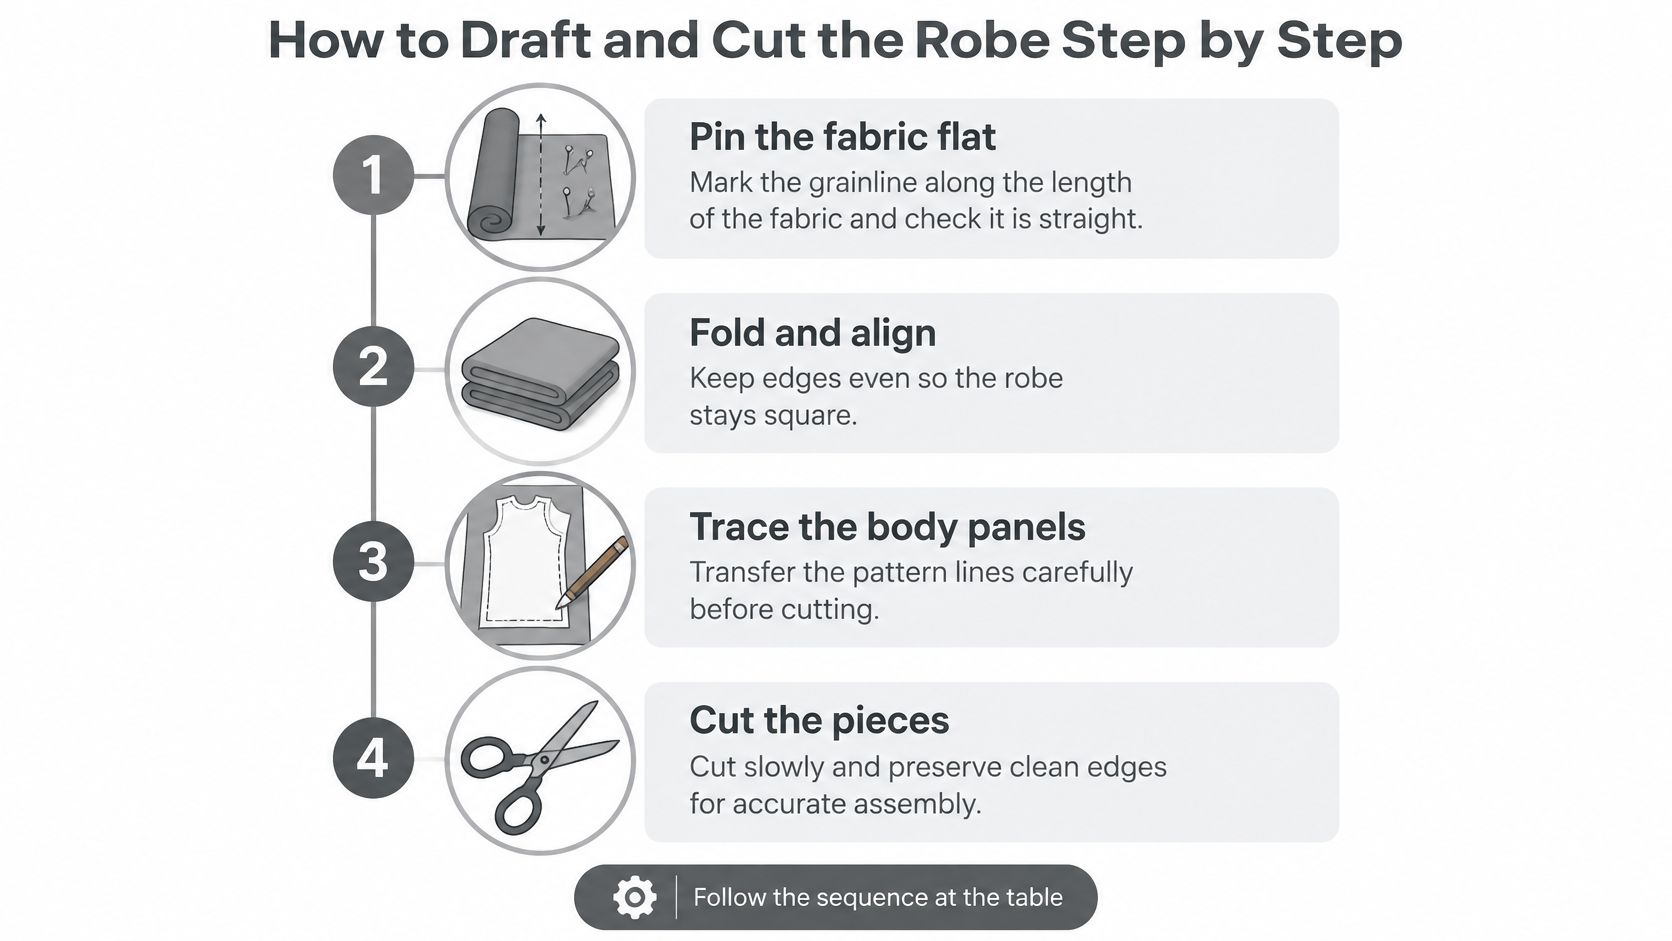
Work flat, work square, and don't let a long panel drift off grain while you're reaching for the chalk. The Mueller und Sohn guide to the Japanese kimono sets the production-ready basics clearly, measuring total body length, hip circumference and yuki, drafting fronts at approximately one-quarter of the hip measurement each, and adding at least 25 cm (10 in) of hip ease for movement and wrap overlap.
Drafting and Cutting Sequence
- Pin the fabric flat and mark the grainline. Run it along the length of the fabric and check it with a set square against the selvedge. A robe cut off grain twists after washing, and you'll chase that twist at every hem.
- Draw the back panel on the fold. Use body length plus hem allowance, and keep the fold edge dead straight. If the fold creeps, the centre back seam line creeps with it.
- Mark each front panel. Start at a quarter of the hip, add ease and overlap, and place the fronts beside the back so the overlap runs right over left as drafted. A front cut too narrow is the classic cause of gaping.
- Draw the sleeves from the remaining yuki span. Keep the opening wide enough for a forearm to move freely, but don't default to maximum width. Oversized openings catch on taps, door handles and stove edges.
- Mark the neck opening and shoulder points. Leave approximately 20 cm (8 in) for the neck opening and mark shoulder joins before you lift the chalk. Guessing these later shifts the collar.
- Add allowances on every edge. Traditional-style allowances of roughly 1 to 1.5 cm support controlled alterations on flat cotton. Terry needs more for bulky seams, and that decision belongs on the draft, not at the machine.
- Cut, then stabilise the long grainlines. Baste or use a light fusible along long edges before pieces are carried around the room. Long terry and linen panels stretch under their own weight faster than you expect.
Layout Check Before the Scissors
Fold the fabric selvedge to selvedge. Lay the back on the fold, place both fronts beside it with grainlines parallel to the selvedge, then nest the two sleeves across the remaining width. Mark cutting lines with chalk on the wrong side and confirm every piece fits within the fabric width with room left for the belt and collar strip.
Calculate yardage from the longest piece plus the sleeve length, then look at the layout again before cutting. People commonly remember the body and sleeves and forget the collar strip, which must run as one continuous piece to sit smoothly.
Drafting from body circumference alone produces pulling at the hips and exposes the body during sitting or walking.
That failure isn't a sewing problem. It's a drafting problem you baked in at step three. Fix it on paper, where the correction costs you a pencil line instead of a recut front panel.
Sewing Order and Seam Finishes That Hold Up
Order matters because this robe is built from long straight joins. If you close the wrong seam first, you'll fight bulk at the underarm and drag panels out of square trying to correct it.
A Sewing Order That Keeps the Robe Square
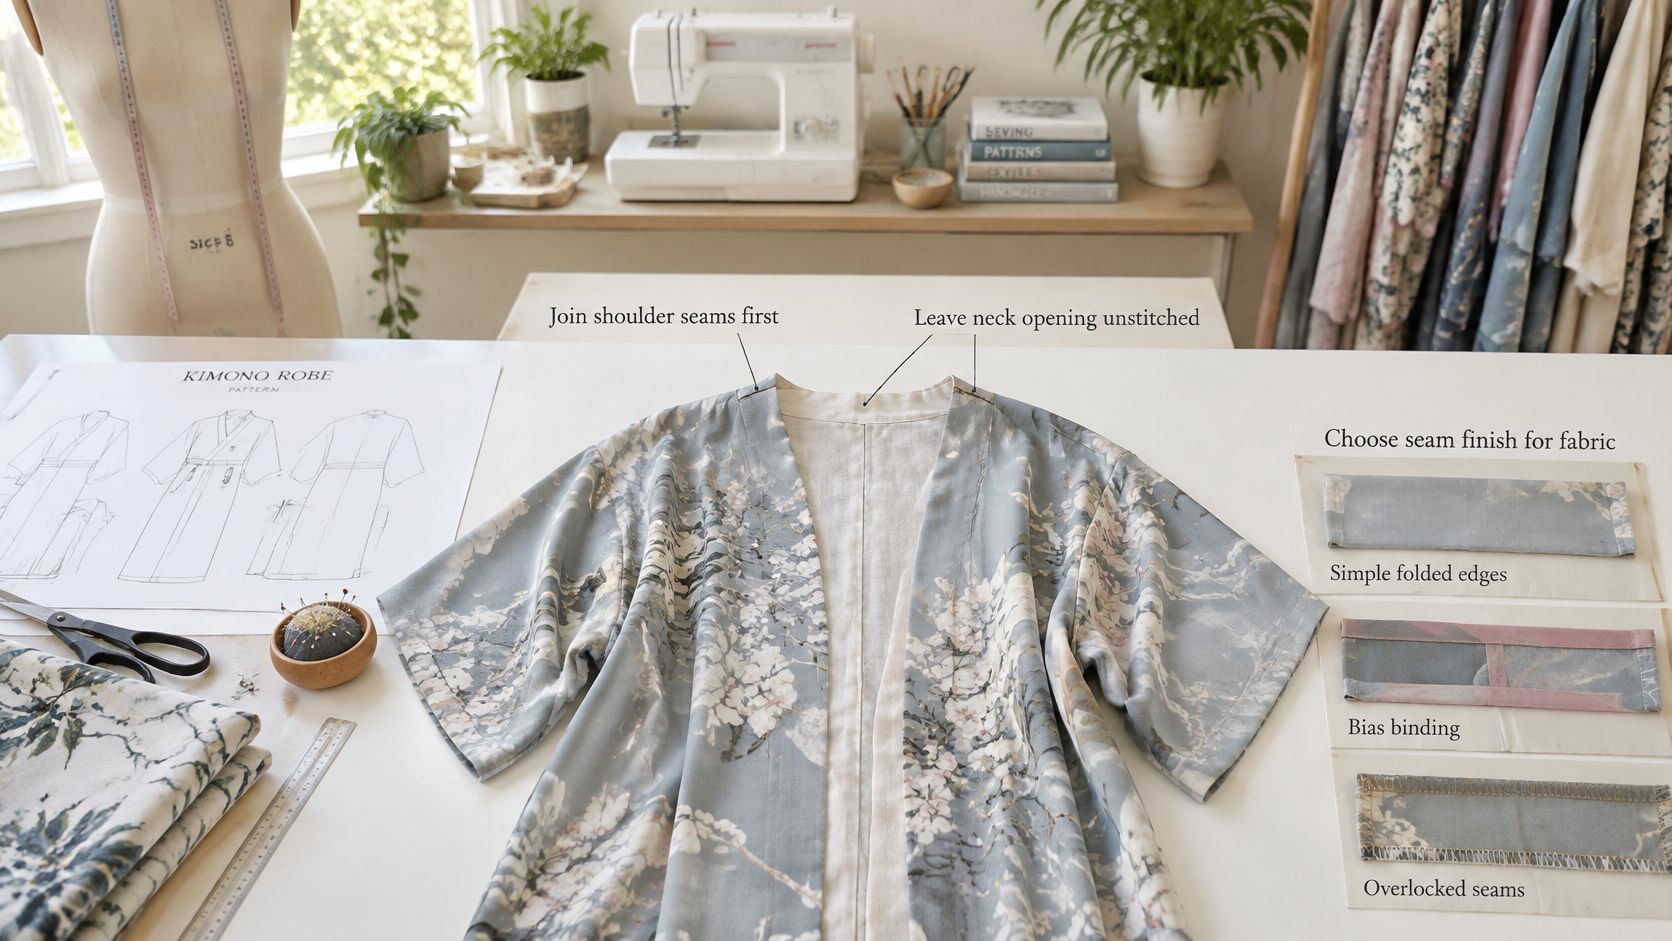
Join the shoulder seams first and leave the neck opening unstitched. That opening is your reference for everything above the chest, so don't close it accidentally while you're in a rhythm. Press the shoulders flat and check both sides measure the same from neck to sleeve edge.
Attach the sleeves at the shoulder fold next. This keeps sleeve openings from drifting and sets the drop of the sleeve while the garment is still flat and easy to handle. Then sew the side seams from the underarm toward the hem, matching body and sleeve edges as you go. Working in that direction lets you ease any small length difference into the hem area rather than puckering the underarm.
Apply the collar as one continuous strip folded over the neck and front edge. Separate collar pieces create a join exactly where the eye lands, and they twist more easily in the wash. Pin the centre of the strip to centre back first, then work toward each front hem so any fullness is shared evenly.
Choosing Seam Finishes by Fabric
- Flat-felled seams: Best on shoulders and sides in terry and sturdy cotton. They hold through repeated washing and lie flat against the body, but they add weight at the shoulder, so grade the layers in heavy terry.
- French seams: Right for lightweight woven cotton, linen and fine waffle. They enclose the raw edge cleanly. Don't force them on thick terry, where the fold won't press and the seam turns ropey.
- Serged or overlocked edges: Fast and practical on terry and waffle when the inside finish matters less than speed. Test tension on scrap first, because waffle texture can make a balanced stitch look loose.
- Bias binding: Useful at the neck and hem when you want a neat, defined edge on a light robe. It adds structure, so skip it where you want the front to fall softly.
The trade-off is always bulk against durability. A flat-felled shoulder in heavy terry will outlast the robe but can feel like a ridge under a bag strap. A French seam in lawn feels invisible and would be miserable to press in terry. Match the finish to the cloth in your hand, not to the finish you used last time.
I would sew one sleeve join and one side seam in scrap fabric first, wash that sample, and pull on it. Ten minutes of testing tells you more about stitch length, pressing and bulk than an hour of unpicking the robe.
Fit Checks and Shrinkage Tests Before Finishing
Many robe patterns online give only a finished width, with no sleeve or belt check, so fit problems surface late, after the robe is already hemmed. Excessive ease is the usual culprit. Belts slide, sleeves drag through water, fronts swing open when you bend, and thick fabric dries slowly because more of it hangs in folds. The ease and overlap you set at the drafting stage still govern everything here; this stage checks whether they work on a moving body.
University garment research hosted by the University of Gothenburg is useful because it frames kimono-like construction around how body panels and sleeves are joined, including the "kimono seam". Under that construction, a loose silhouette still demands measured fitting: finished ease, sleeve opening, belt security, and the way terry, waffle and linen change drape and bulk on an actual body.
The Movement Check
Baste or pin the robe closed before you hem it. Wrap it the way it'll be worn, tie the belt at the natural waist, then run three plain tests.
- Sit down and stand up twice. Your hips and thighs should stay covered without you tugging the underlap across.
- Reach forward and up. The back shouldn't pull tight across the shoulders, and sleeves shouldn't slide past your hands.
- Walk and turn. The belt should stay put and the fronts shouldn't separate at the hip with each stride.
A robe that fails one test usually fails for a measurable reason, so match the symptom to the fix before you recut anything. If you're checking coverage across a wider size range, our notes on kimono robe fit in plus sizes show where wrap depth and belt placement need extra attention.
Fit symptoms, causes and fixes
| Symptom | Likely cause | Fix |
|---|---|---|
| Hips pull or gape when sitting | Too little hip ease or wrap overlap | Widen the wrap overlap and recheck the hip ease in your draft |
| Sleeves drag when reaching | Sleeve too long or opening too wide | Shorten the sleeve and narrow the opening |
| Belt slides off the waist | Too much ease or heavy terry | Shorten the belt or add a second tie point |
| Robe shortens after washing | Fabric not pre-washed | Wash a swatch and add length before cutting |
| Shoulders stretch and sag | Heavy robe on a thin hanger | Use a sturdy hanger and dry fully |
Shrinkage Test and Length Adjustments
Wash a measured swatch exactly as the finished robe will be washed. Use a gentle cycle, cold water and a mild detergent free of harsh chemicals, bleach or fabric softeners, then air dry or tumble dry on the lowest heat. Measure the swatch before and after in both directions, because shrinkage rarely runs evenly, and only then grade the final length.
Hang the finished robe on a sturdy, wide-shouldered hanger and let it dry fully before storage. A wet terry robe is heavy enough to stretch its own shoulders on a thin hanger.
For petite and tall wearers, change length and sleeve length, not width. Shortening a robe by narrowing the fronts destroys the wrap. Add or remove length at the hem and sleeve edge, keep the hip ease intact, and recheck belt height so it still lands at the waist.
Choose Your Robe Style and Cut a Test Version
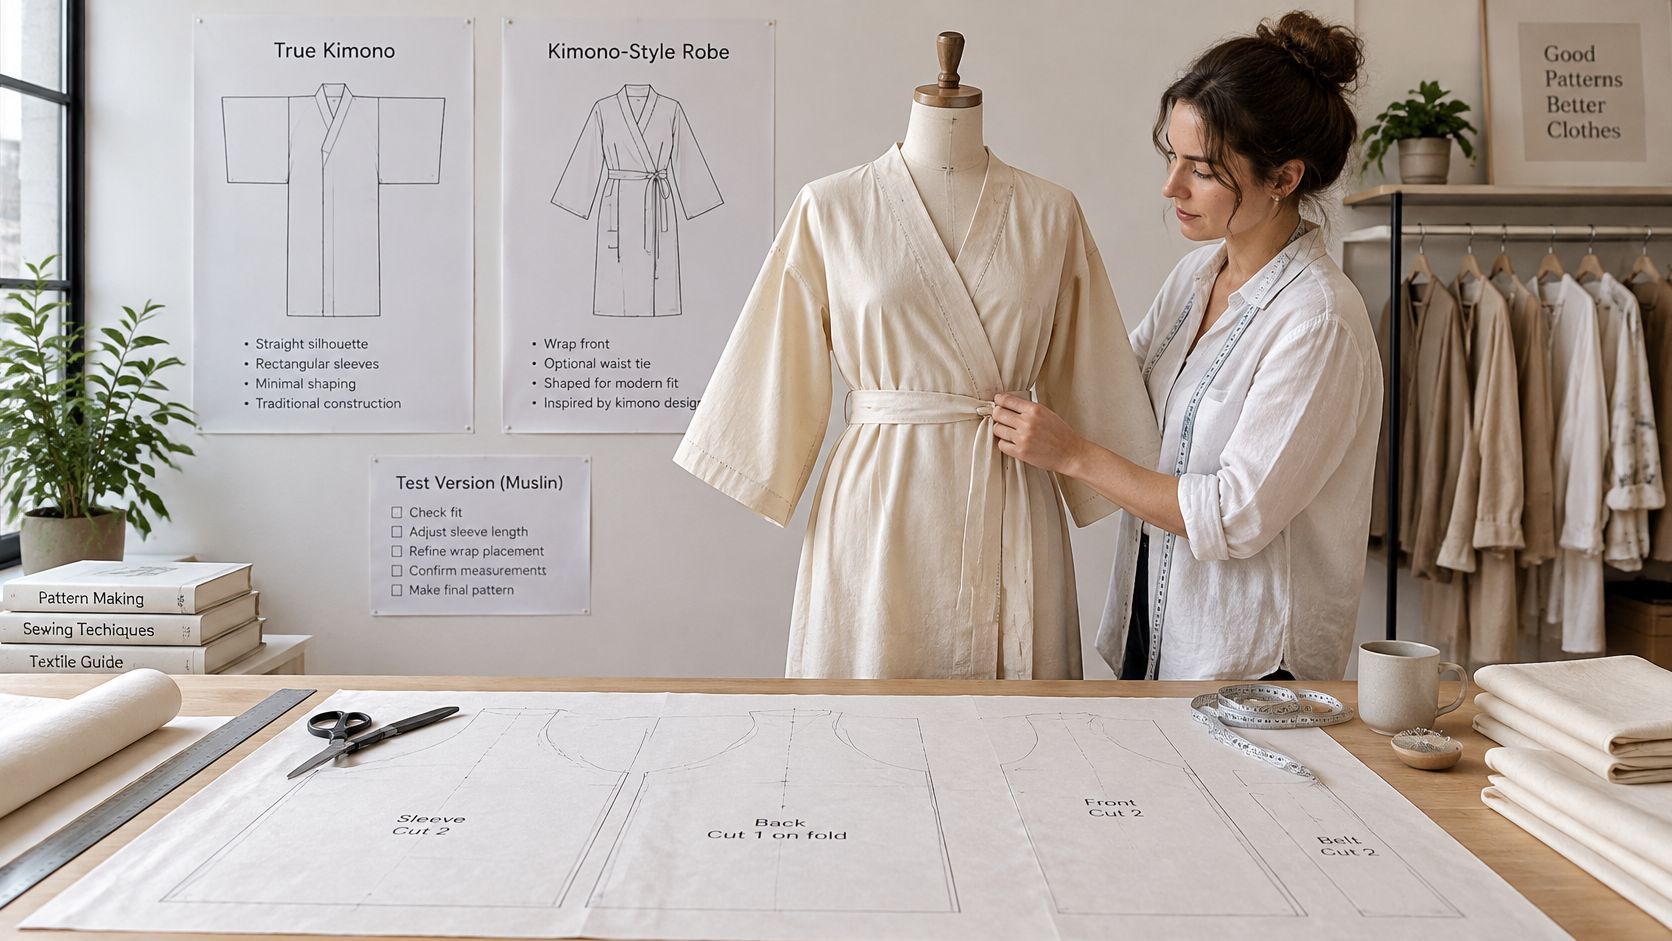
Name what you're making before you cut it, because the name changes honest pattern choices. A true kimono is tied to Japanese etiquette, identity, fabric handling and historical construction. Most home robe patterns aren't that. They're a Western kimono-style robe, a wrap with a T-shaped silhouette, wide sleeves and a simple front opening.
Other labels you'll meet include yukata-inspired, haori-inspired and generic wrap robe. None of those labels is a quality judgement. They're descriptions, and using them accurately matters if you're giving the robe as a gift, listing it for sale or briefing a buyer.
Adaptations to Own Honestly
Sleeve proportion on a bathrobe is usually a contemporary adaptation for sinks and cooking, not a traditional rule. Belt placement is another. A bathrobe belt sits where it's comfortable and secure, which isn't the same decision as obi placement. Overlap direction, motif choice and collar width deserve the same honesty. Say what's traditional, say what you've adapted, and don't present one simplified version as universally authentic.
If you want a reference for how the finished wrap should sit and tie, our guide on how to wear a kimono robe shows the wearing checks to build into your fitting.
Cut the Test Version First
Cut your test robe in inexpensive cotton, not in the terry you've been saving. Sew the shoulders, sleeves and sides, leave hems raw, and put it through the seated, reaching and walking checks. Wash it once. Then adjust the paper pattern for length, sleeve opening and wrap depth while the evidence is in front of you.
Our own range spans hooded, kimono, luxury, hotel, maternity and lightweight styles, and that spread exists for a practical reason. Different uses demand different sleeve lengths, weights and wrap depths. Your test version tells you which of those you need. Our Organic Turkish Terry bathrobes, for context on the heavier end, are made of 100% Turkish cotton and are GOTS-certified, which is exactly why you don't want to learn ease lessons on cloth like that.
Write your hip, length and yuki measurements directly on the pattern, note the fabric you tested in, and cut the test version this week while those numbers are still fresh.
If you'd rather compare your test robe against a finished garment before cutting expensive terry or waffle, visit SEYANTE to see how our kimono, lightweight and terry robes handle wrap depth, sleeve length and fabric weight in practice. Use those proportions as a benchmark at your cutting table, then draft the version that fits your body and your morning routine.