Hair Wrap Around Ponytail: Step-by-Step Guide for 2026
You've smoothed your ponytail, checked the back in the mirror, and noticed the elastic is still the first thing you see. A strand wrapped around the base can hide it neatly, but pulling harder won't make that finish better. The trick is choosing a wrap your hair can support, then securing the decoration without tightening the ponytail underneath.
What a Wrapped Ponytail Is and Who It Suits
A wrapped ponytail is a ponytail with its securing point concealed or decorated by a strand of hair, scarf, ribbon, or accessory. The strand version looks natural because the covering appears to grow directly into the gathered hair.
The underlying hairstyle isn't new. Historical accounts described in the Sierra Sun's ponytail history trace depictions of tied-back hair to ancient Cretan frescoes dating to approximately 1600 BCE. The modern wrap changes the finish, not the basic construction.
When the finish works well
Say you're getting ready for work with a mid-height ponytail. The shape already feels comfortable, but the exposed tie makes it look unfinished. Taking a small underside strand and wrapping it across the elastic adds polish without requiring you to rebuild the hairstyle.
This works particularly well when:
- Your hair reaches comfortably around the base. Medium to long hair usually offers more room to conceal the end.
- The ponytail already stays put. A decorative strand can cover a good foundation, but it shouldn't hold the entire hairstyle together.
- You want a subtle finish. The same technique suits a workday, dinner, or an occasion where you'd rather hide the accessory.
When to choose something else
Very short layers may not reach around the elastic without sticking out. A soft scarf can be more practical than forcing those ends into place.
If your ponytail already pulls at the temples, solve that problem before wrapping it.
The wrap is decoration, not a tightening device. A polished base should feel comfortable before you conceal it.
With a suitable method, you can choose a strand that suits your texture, hide the elastic, and recognize when the finished style needs loosening rather than more pins.
Choosing the Right Wrap for Your Hair Type
| Hair type | Strand width | Tie and pin | Why it works |
|---|---|---|---|
| Fine hair | Narrow, just enough to cover the tie | Flat elastic, small pin, light teasing underneath | Preserves ponytail volume and limits bulk |
| Thick or dense hair | Slightly fuller strand, or a section gathered in stages | Concealed mini elastic and supporting pins | Supports the base without asking the wrap to carry its weight |
| Slippery straight hair | Narrow strand lightly smoothed with cream | Textured or satin-covered tie, checked for grip | Helps control sliding and unravelling |
| Curls and coils | Small section shaped gently along its natural curve | Soft breathable band or scarf, discreet pin if needed | Keeps the texture recognizable without stretching it straight |
| Short layers | Tiny crown strand that reaches naturally around the base | Tiny pins only | Limits visible bumps and avoids forcing short ends into place |
Treat this grid as a starting setup, not a prescription. Accessory coverage such as The Kit's hair-accessory trend guide shows how many decorative options exist, but choosing between them requires more than matching a photograph. Your strand needs to reach, your tie needs to grip, and the finished base needs to feel comfortable.
Match the method to the hair's behavior
For fine hair, separate the wrapping strand before committing to it. If the remaining tail suddenly looks sparse, return some hair to the ponytail. Light teasing belongs on the concealed underside, not across the visible surface.
Dense hair needs support at the base. Gather it in manageable sections if that helps you control the shape, keeping any additional elastic concealed. Don't compensate for weight by cinching the decorative strand harder.
For slippery hair, test the tie before adding the wrap. Satin-covered doesn't automatically mean grippy, so reject any tie that slides during a gentle movement check. With curls or coils, shape the selected section with your fingers rather than brushing it into a texture that doesn't match the rest.
Short layers require an honest reach test. If the crown strand only reaches when pulled taut, use a scarf or leave the elastic visible instead.
Adjust for the day you're having
Heat and humidity may make a lightweight scarf or soft band more convenient than a carefully pinned strand. Choose a manageable fabric length and tuck loose ends away from clothing fasteners. Our guide to hair turbans for women can help distinguish a full-head covering from a small ponytail accessory.
Skip the decorative wrap for swimming or intense exercise, when movement and repeated adjustments complicate the hold. After swimming, wait until your hair is dry before styling it.
Match the tie to how your hair behaves, not to the prettiest finished photo.
Step-by-Step Hair Wrap Around a Ponytail
Set out a snag-free elastic, styling cream, a comb, and small bobby pins before gathering your hair. A second mirror helps you check the underside without twisting or tugging the finished ponytail.
For sizing, the hair-wrap tutorial from L'Oréal Paris recommends an approximately 0.5-inch section and describes short 1.75-inch pins placed diagonally from opposite sides for a concealed crossing hold. Those are useful starting points, not reasons to force a section that looks too large for your ponytail.
Build the base and cover it
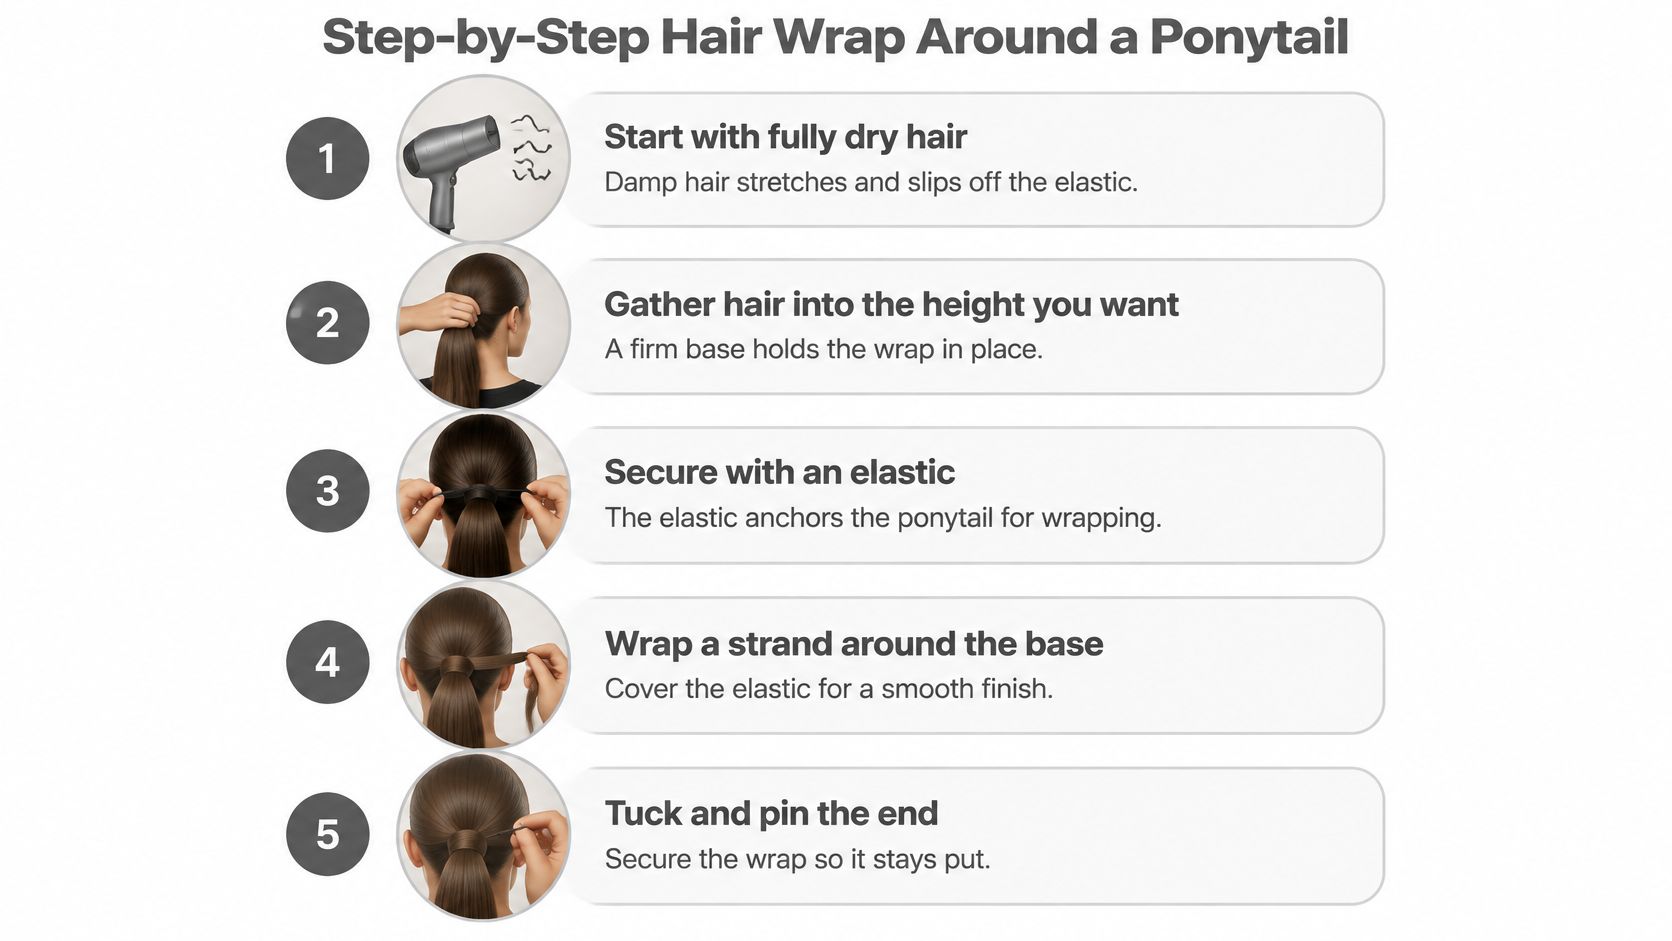
Start with fully dry hair. Detangle gently, including the nape, so you don't trap a knot beneath the elastic. Damp hair can stretch during handling, making it harder to judge a comfortable finished fit.
Gather at your chosen height and secure the elastic. Support the gathered hair with your hand while smoothing the surface, rather than dragging the tie outward to tighten everything. Stop when the base stays in position without pulling your facial skin.
Separate the underside strand and smooth it with cream. Use the starting width described above, then adjust downward if it removes too much fullness from the tail. Spread a small amount of cream between your fingertips and stroke it along the section, keeping product off the elastic.
Give a slick strand a gentle curve if needed. You can guide it around your finger before wrapping; a naturally curly section may need no additional shaping. The aim is pliability, not a tight curl or an extra heat-styling task.
Catch the end with a bobby pin. Slide the section's tip between the pin's arms so the pin holds the ends together, leaving enough hair captured that it won't immediately slip free. Keep hold of the pin as you guide the strand around the base.
Lay the strand around the elastic. Wind it in overlapping passes, using your free hand to stop the ponytail rotating. Keep the strand flat and snug against the tie, not stretched tightly enough to squeeze the base.
Tuck and anchor underneath. Turn the pin toward the underside and slide it into the hair beside the elastic, catching the wrapped end and some base hair without scraping the scalp. If extra support is needed, insert another short pin diagonally from the opposite side so the concealed pins cross.
The overview below shows the main movements. The written routine adds the strand preparation and pin-placement details.
Check before adding more product
A clean finish has a neat band of hair, concealed elastic, tucked ends, and no pins showing from the front. Turn your head gently before deciding the job is done.
Skipping cream can leave flyaway ends harder to control, but using too much can make the strand slippery. Start sparingly rather than coating the whole section.
If you're styling after washing, separate drying from styling. Our after-shower hair-wrap guide addresses that earlier part of the routine; the decorative ponytail wrap comes after the hair has dried.
Fixing a Wrap That Slips, Bulges or Pulls
You finish the wrap, turn away from the mirror, and catch it sliding before you have left the house. Tightening everything is the tempting move, and usually the wrong one. Diagnose first: hold the ponytail base with one hand and nudge the wrapped band with a finger. A band that rotates on its own points to the strand or a pin. A band that travels together with the whole ponytail points to the elastic underneath.
Wrap symptoms, causes and fixes
| Symptom | Likely cause | Fix |
|---|---|---|
| Wrap slides down or unravels | Strand too thin to grip, or product skipped | Rewrap from step 3 with a wider strand; lightly tease its concealed underside or switch to a textured tie for grip |
| Lumpy or bulky wrap | Too much hair selected in step 3 | Reduce the section by selecting less hair from the underside, and return the excess to the tail |
| Elastic shows through | Coverage in step 6 stopped short | Add one overlapping pass, only if the end reaches without pulling |
| Pin pokes out | Pin too long, or placed through the top | Swap in a shorter pin and insert it diagonally from underneath |
| Base drops during wear | Elastic stretched past its hold | Replace the tie, then redo the wrap on the new base |
| Pulling at the temples | Base secured too tightly | Undo the wrap, loosen the elastic, and regather without dragging the side sections |
| Frizz on the wrap | Humidity or too little surface control | Apply light-hold spray to the wrapping strand |
When a wrap reads bulky, divide the section into thinner pieces or take less from the start, and let the unused portion fall back into the hanging ponytail rather than layering all of it around the same spot.
Visible elastic also needs a reach check. When the ends cannot make another comfortable pass, reposition the existing wrap or choose a narrower tie. Pulling a short strand harder usually trades a small cosmetic gap for an uncomfortable finish.
Make the smallest useful change
Surface frizz is different from structural failure. If the base and pin are stable, smooth only the wrapping strand rather than soaking the entire hairstyle. For help choosing a finishing product, Finding Favourites' guide to affordable hairsprays with salon-quality hold offers a useful starting point.
Pin direction is another quick correction. If a pin remains visible, remove it completely and reinsert it underneath; pushing an exposed pin harder can make it press against the scalp.
Troubleshooting rule: Adjust the part that failed and leave the rest of the ponytail's tension where it was.
A misplaced pin or uneven overlap can be corrected immediately. A better tie, strand size, or ponytail position may take separate wear trials, so change those individually and judge each on its own. Every fix should keep the base tension where it was or reduce it; a repair that only holds because it pulls harder is a new symptom, and pain is a signal to stop and loosen.
Keeping the Wrap Gentle and Testing It on Your Hair
The ponytail should hold firm against rotation while staying loose enough that it never pulls persistently at the hairline. The Hairstyle Atlas ponytail guide identifies tension management as the central concern and recommends securing the wrapped end underneath instead of increasing elastic tension.
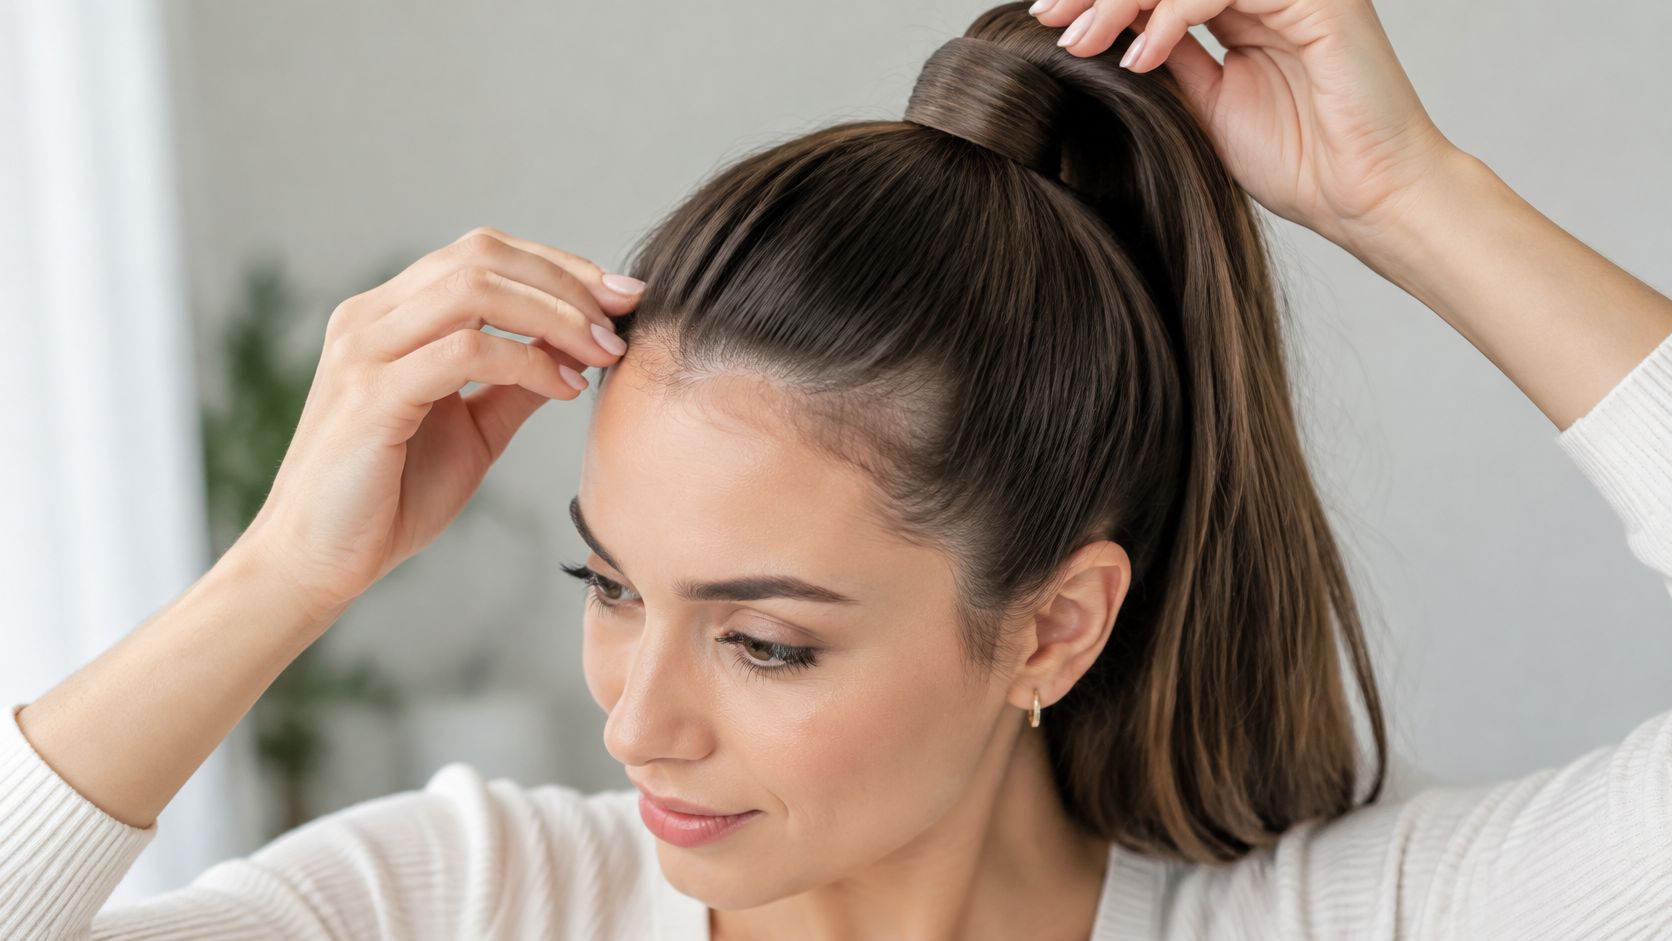
Try a gentle lift check while supporting the base. If lifting the ponytail noticeably tugs the hairline or moves the skin at your temples, loosen it. This check tells you the style sits within an acceptable range right now and does not confirm that the style is medically safe.
The image shows the kind of adjustment to make carefully, with support near the base and no sharp pull on the tail.
Recognize when decoration becomes traction
Repeated pulling can contribute to traction alopecia, a form of hair loss associated with mechanical stress. A medical review of traction alopecia explains that risk relates to both pulling force and duration, with particular concerns around tight styles and chemically processed hair.
A soft fabric label doesn't cancel out a tight base or heavy accessory. Keep the wrap strand only as large as coverage requires, choose a fabric-covered or snag-free elastic, and avoid repeatedly tightening the style during wear.
- Remove it for warning signs. Scalp tenderness, headache, broken hairs, or small hairline bumps mean the style should come out.
- Vary the placement. Don't concentrate the tie and its friction on exactly the same spot every time.
- Give fragile hair extra room. Chemically treated, thinning, or easily broken hair calls for a looser setup and shorter wear.
- Seek help for persistent changes. Visible thinning, ongoing soreness, or recurrent bumps deserve assessment by a dermatologist.
Take the ponytail down for sleep instead of leaving the decorated base pressed against a pillow. If you prefer covering your hair overnight, our guide to a hair turban for sleeping explains that separate choice; any covering should sit loose and easy on the hairline.
Make the first wear a controlled test
Use a relaxed day for your first attempt, when you can take the style down easily if anything feels off. Start with a flat tie and a modest underside strand, then record three details: ponytail height, tie type, and pin position. Written notes turn a vague impression of "it held" into a setup you can repeat.
On later attempts, change only the part that needs improvement. Testing works like adjusting one dial at a time: a different elastic won't tell you much if you also change the height, strand size, and pin direction in the same trial.
A wrap that stays presentable through your intended wear, without headache, tenderness, or an unusually pronounced dent, is a useful result. An easy feel does not, on its own, rule out damage, so don't extend wearing time just because the style still looks neat.
If a trial fails, reduce tension and simplify the wrap before adding accessories. This week, pick a ponytail height your hairline tolerates, run one wear trial, and write down what stayed secure and what needed adjusting.
We offer towel wraps for men and women and hair turbans for the care routine around your styling. Visit SEYANTE to explore options for wash day or the break between pinned styles.